How to make Banners in Android App?

Hi, Everyone welcome to my first blog, In this blog we will see how to make banners using viewpager2 and dots indicator in Kotlin.
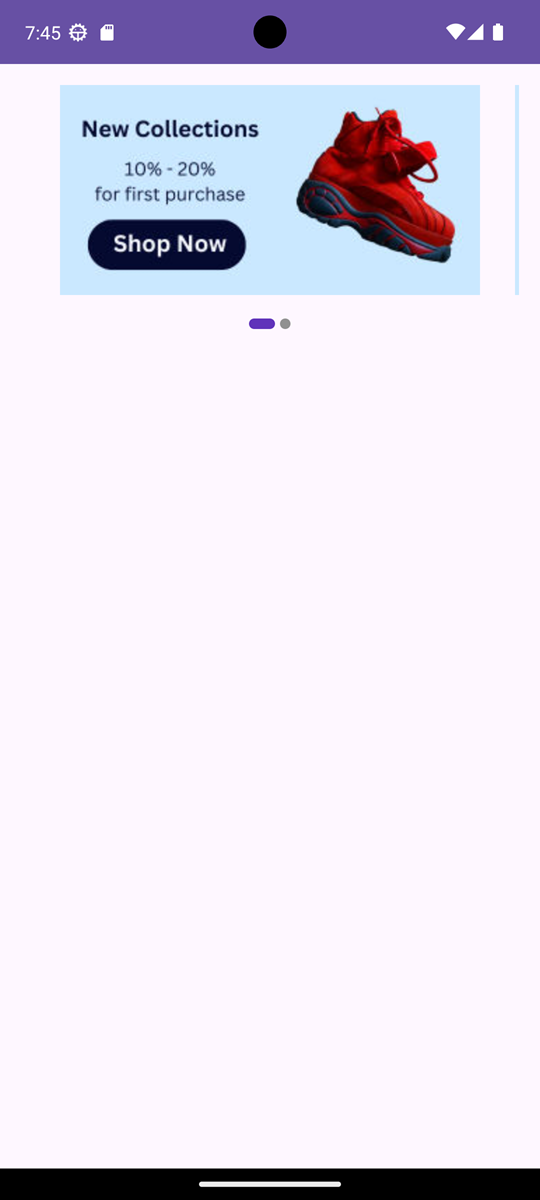
The final outcome of the app will be,
Ok, Let's get started.
Create a new project in android studio and select empty view activity and enable view binding for your project.
Now, follow the steps below.
Import the required dependencies.
    //Glide
    implementation("com.github.bumptech.glide:glide:4.16.0")

    //Pager Dots Indicator
    implementation("com.tbuonomo:dotsindicator:5.0")
Write the Xml code for the banner.
<?xml version="1.0" encoding="utf-8"?>
<androidx.constraintlayout.widget.ConstraintLayout xmlns:android="http://schemas.android.com/apk/res/android"
    xmlns:app="http://schemas.android.com/apk/res-auto"
    xmlns:tools="http://schemas.android.com/tools"
    android:layout_width="match_parent"
    android:layout_height="match_parent"
    tools:context=".MainActivity">

    <LinearLayout
        android:layout_width="match_parent"
        android:layout_height="wrap_content"
        android:layout_margin="16dp"
        app:layout_constraintEnd_toEndOf="parent"
        app:layout_constraintStart_toStartOf="parent"
        app:layout_constraintTop_toTopOf="parent"
        android:orientation="vertical">

        <androidx.viewpager2.widget.ViewPager2
            android:id="@+id/banner"
            android:layout_width="match_parent"
            android:layout_height="160dp"
            android:paddingStart="24dp"
            android:clipToPadding="false"
            android:clipChildren="false"
            android:paddingEnd="24dp"
            />

        <com.tbuonomo.viewpagerdotsindicator.DotsIndicator
            android:id="@+id/dotIndicator"
            android:layout_width="wrap_content"
            android:layout_height="wrap_content"
            android:layout_gravity="center"
            android:layout_marginTop="18dp"
            app:dotsSize="8dp"
            app:dotsColor="@color/gray"
            app:dotsCornerRadius="10dp"
            app:dotsSpacing="2dp"
            app:dotsWidthFactor="2.5"
            app:selectedDotColor="@color/purple"/>
    </LinearLayout>


</androidx.constraintlayout.widget.ConstraintLayout>
Write the xml code for the Banner image item.
<?xml version="1.0" encoding="utf-8"?>
<ImageView xmlns:android="http://schemas.android.com/apk/res/android"
    android:layout_width="match_parent"
    android:layout_height="match_parent"
    android:minHeight="150dp"
    android:id="@+id/bannerImg"
    android:scaleType="fitCenter"
    android:adjustViewBounds="false">

</ImageView>
Write the ViewHolder and Adapter class.
package com.example.bannerapp

import android.content.Context
import android.view.LayoutInflater
import android.view.ViewGroup
import androidx.recyclerview.widget.RecyclerView
import androidx.recyclerview.widget.RecyclerView.Adapter
import com.bumptech.glide.Glide
import com.bumptech.glide.load.resource.bitmap.CenterInside
import com.bumptech.glide.request.RequestOptions
import com.example.bannerapp.databinding.BannerItemBinding

class BannerViewHolder(private var bannerItemBinding: BannerItemBinding): RecyclerView.ViewHolder(bannerItemBinding.root) {

    fun bindData(url:String,context: Context){
        val request = RequestOptions().transform(CenterInside())
        Glide.with(context)
            .load(url)
            .apply(request)
            .into(bannerItemBinding.bannerImg)
    }

}

class BannerAdapter(private val list: List<String>,private val context: Context):Adapter<BannerViewHolder>(){
    override fun onCreateViewHolder(parent: ViewGroup, viewType: Int): BannerViewHolder {
        val binding = BannerItemBinding.inflate(LayoutInflater.from(parent.context),parent,false)
        return BannerViewHolder(binding)
    }

    override fun getItemCount(): Int {
        return list.size
    }

    override fun onBindViewHolder(holder: BannerViewHolder, position: Int) {
        holder.bindData(list[position],context)
    }

}
Now, set properties for the View Pager and Dots Indicator in Main Activity.
package com.example.bannerapp

import androidx.appcompat.app.AppCompatActivity
import android.os.Bundle
import androidx.recyclerview.widget.RecyclerView
import androidx.viewpager2.widget.CompositePageTransformer
import androidx.viewpager2.widget.MarginPageTransformer
import com.example.bannerapp.databinding.ActivityMainBinding
import com.example.bannerapp.databinding.BannerItemBinding

class MainActivity : AppCompatActivity() {
    private lateinit var binding:ActivityMainBinding
    override fun onCreate(savedInstanceState: Bundle?) {
        super.onCreate(savedInstanceState)
        binding = ActivityMainBinding.inflate(layoutInflater)
        setContentView(binding.root)

        var listOfBanner = listOf<String>("https://ik.imagekit.io/46cgl7uvt/Banner/New%20Collections.png?updatedAt=1712583342400","https://ik.imagekit.io/46cgl7uvt/Banner/New%20Collections.png?updatedAt=1712583342400")

        binding.banner.apply {
            adapter = BannerAdapter(listOfBanner,context)
            offscreenPageLimit = 3
            getChildAt(0).overScrollMode = RecyclerView.OVER_SCROLL_NEVER
            val compositePageTransformer = CompositePageTransformer().apply {
                addTransformer(MarginPageTransformer(40))
            }
            setPageTransformer(compositePageTransformer)
            if (listOfBanner.size>1){
                binding.dotIndicator.attachTo(this)
            }
        }
    }
}
offscreenPageLimit refers to the image that need be retained off the screen.
Setting the over-scroll mode to OVER_SCROLL_NEVER means that over-scrolling behavior will be disabled for the RecyclerView's child view.
MarginPageTransformer is used to allocate space between the pages in the view pager.
After this, if there are more than one banner that we need to display then we need to attach dotsIndicator to view pager.
This can be easily done using ,
binding.dotIndicator.attachTo(this)
Ok, That's it.
Now, build and run your app, we have successfully made banner for our app.
you can get the source code from clicking below.
Thank you for reading my blog.
See you next post.